Axure Docs
  • Axure RP Reference
  • Axure RP Tutorials
  • Axure Cloud Reference
  • Axure Support
  • Download

›Advanced Interactions

Installing and Activating RP

  • Activating Axure RP
  • Installing on macOS
  • Installing on Windows

Getting Started

  • Getting Started Video
  • The Axure RP Environment
  • Viewing and Sharing Your Prototypes
  • Keyboard Shortcuts
  • Auto-Saved Backup Files

Working with Widgets

  • Organizing Widgets
  • Widget Groups
  • Styling Widgets
  • Widget Libraries
  • The Grid, Guides, and Snapping

Basic Widgets

  • Buttons, Shapes, & Text
  • Images
  • Hot Spots
  • Lines & Arrows
  • Dynamic Panels
  • Inline Frames
  • Text Fields & Text Areas
  • Droplists
  • List Boxes
  • Checkboxes
  • Radio Buttons
  • Trees
  • Tables
  • Classic Menus
  • Snapshots

Working with Pages

  • Managing Pages
  • Styling Pages

Masters

  • Creating and Using Masters
  • Master Views
  • Raised Events

Introduction to Interactions

  • Events, Cases, and Actions
  • List of Events
  • List of Actions
  • Text Links
  • Style Effects
  • Animations

Advanced Interactions

  • Variables
  • Conditional Logic
  • Math, Functions, and Expressions
  • Selection Groups
  • Move Action Boundaries

The Repeater

  • Repeaters
  • Dynamically Adding Rows
  • Dynamically Deleting Rows
  • Updating Rows
  • Marking Rows
  • Sorting Rows
  • Filtering Rows
  • Pagination

Adaptive Views

  • Adaptive Views

Documenting Your Prototype

  • Page and Widget Notes
  • The Word Specification
  • Printing

Flow Diagrams

  • Flow Diagrams
  • Flow Connectors

Publishing Your Prototype

  • The Prototype Player
  • Customizing the HTML Output
  • Web Fonts and Font Mapping

Team Projects

  • Creating and Sharing Projects
  • Working with Team Projects
  • Team Project History
  • Troubleshooting Team Projects
  • Upgrading Projects to RP 9

Move Action Boundaries

The Move action allows you to set boundaries on how far its target widget can be moved in any direction. Try dragging the slider thumb below:

To add a boundary to a Move action, click More Options and then click Add boundary.

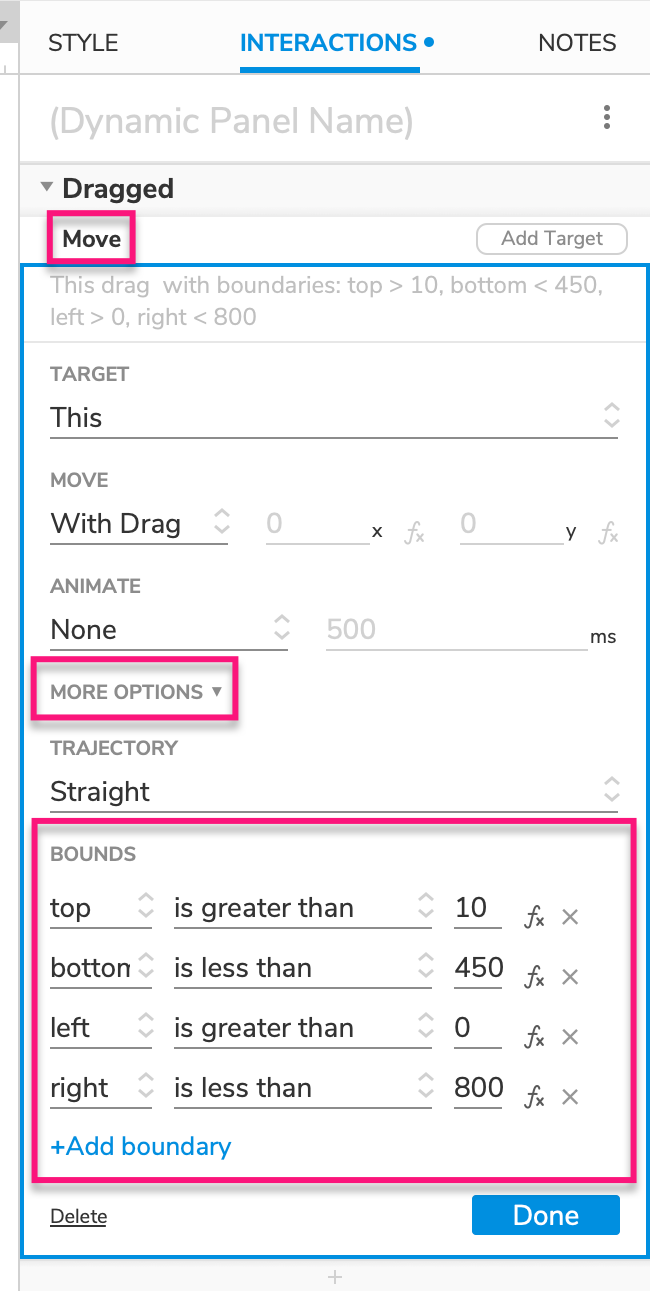
Movement boundaries are broken down into three parts:

  1. The first dropdown represents the side of the widget you want to place the boundary on: its top, left, right, or bottom edge.

  2. The second dropdown defines a comparison between the X or Y value of the selected widget edge and the pixel value entered in the field to the right.

  3. The field to the right defines an X or Y value that the selected widget edge is compared to.

For example, a boundary reading top — is greater than — 10 means that the Y value of the widget's top edge must be 11 or greater. In other words, this Move action cannot move the widget's top edge any farther up on the page than Y=11.

Tip

You can use a math expression to dynamically generate the pixel value in the fx field. This is especially helpful when you want to use other widgets on the page as boundary markers. Check out the slider control tutorial for an example.

← Selection GroupsRepeaters →
Axure Docs
Stay Connected

Sign up to receive Axure tutorials and news. You can unsubscribe at any time.

Axure
TourEnterpriseCompanyDownloadPurchase
Legal
Customer AgreementPrivacy PolicyGDPRSecurityPatents
Resources
BlogForumLicense PortalAxure Cloud
Support
Learn and SupportGetting StartedReferenceWidget LibrariesAxure RP 8 Documentation and Tutorials
Copyright © 2002–2021 Axure Software Solutions, Inc. All rights reserved. Axure® is a registered trademark of Axure Software Solutions, Inc.